Code Analysis

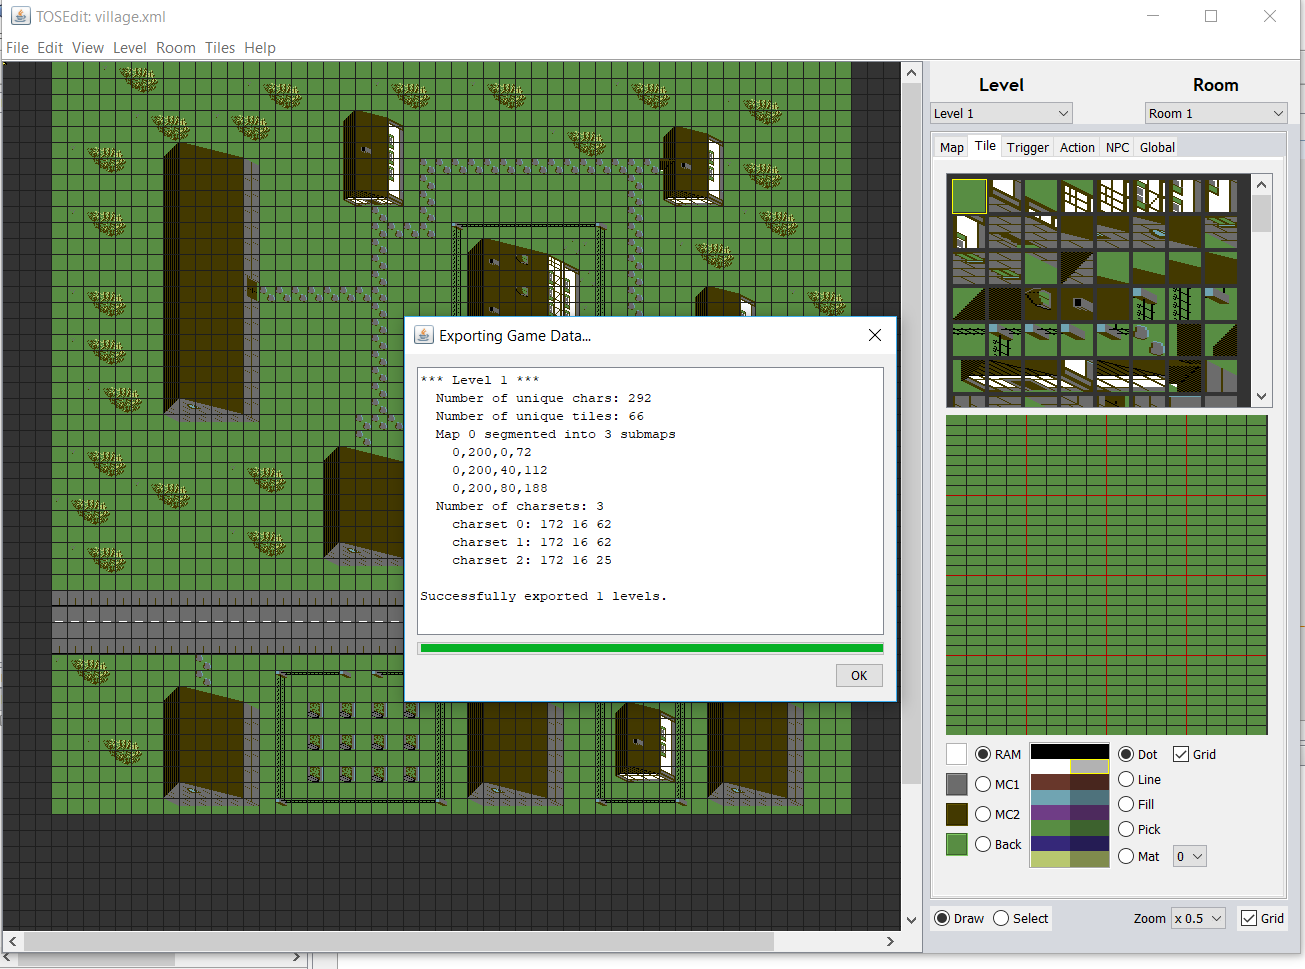
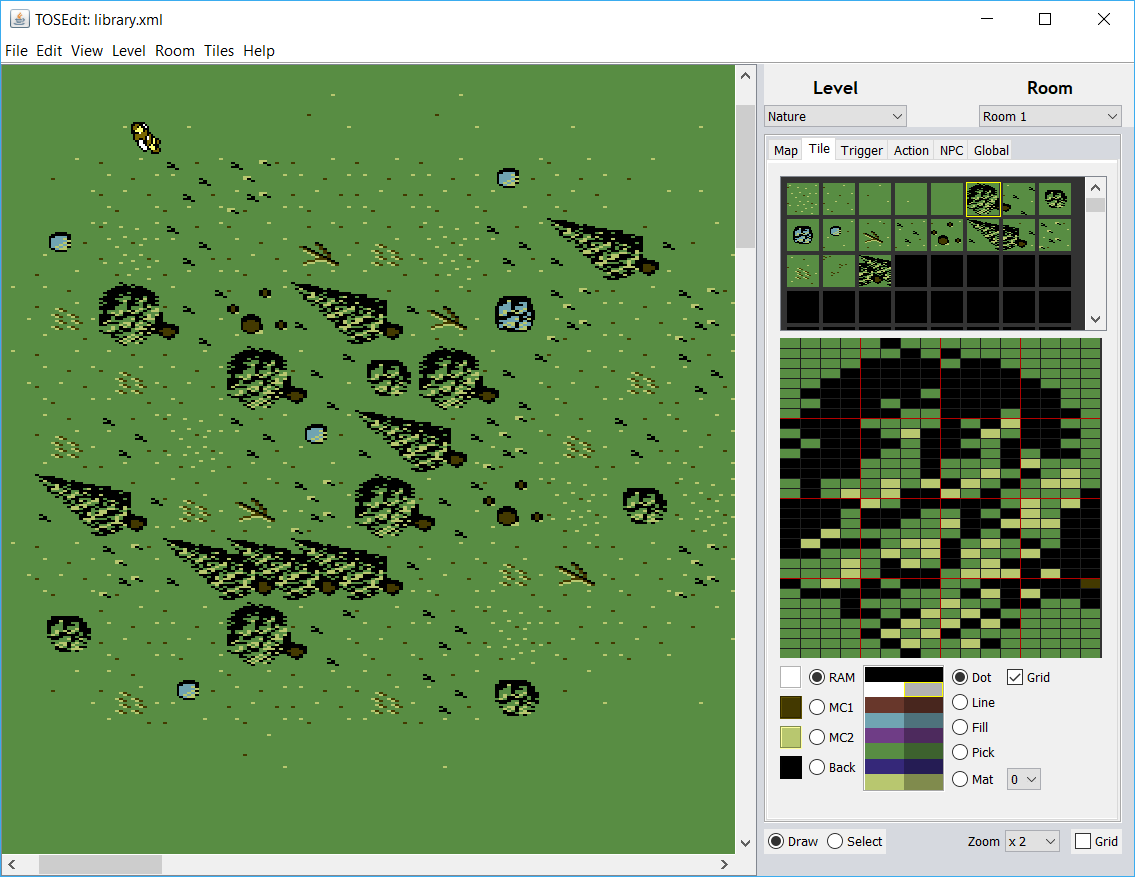
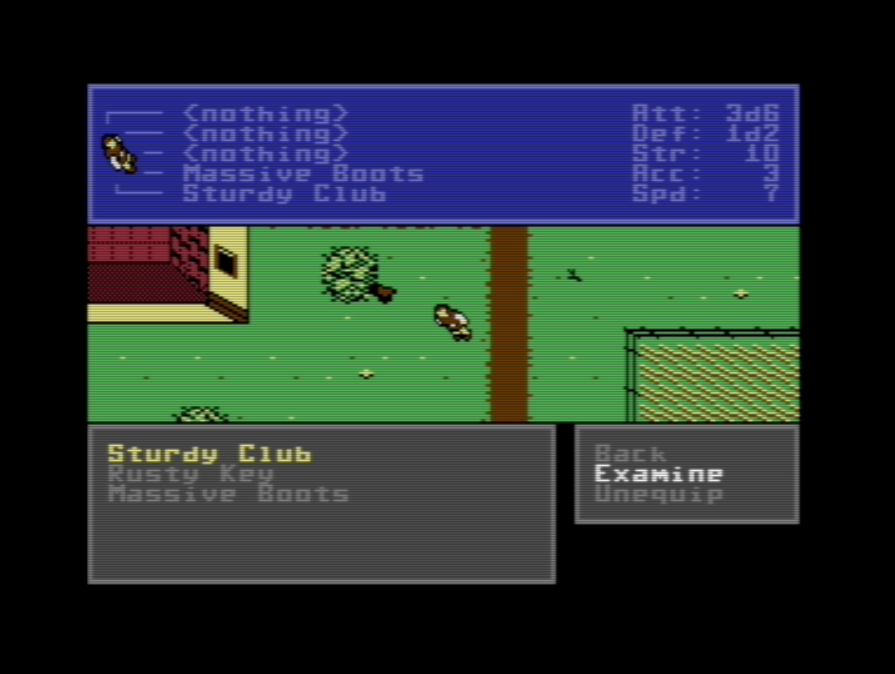
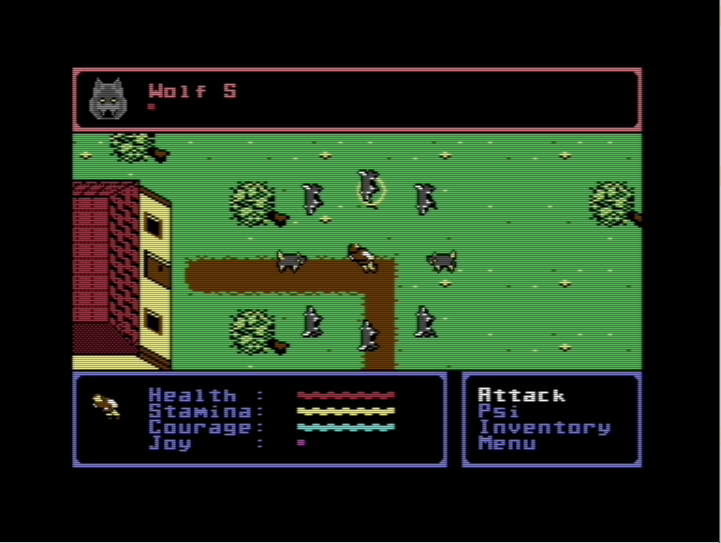
Phew, quite some time since the last update! I had to make some development pauses due to other priorities (my second hobby music gained some more traction for a while, with me taking singing lessons and revising my equipment, also my job took more of my time and energy than it should). But nevertheless there was some progress: I have completely rehauled the combat system and am nearly done with that. It turned out to be more challenging than I thought and involved a lot of cycle counting to get it right. This for sure deserves a blog entry on its own when it is complete. Here is a little preview:

Combat with eight enemies

Another thing that I did is that after needing to ramp up several times after development pauses I decided to create a tool to help me understanding my own code structure. An assembly project as large as this game is hard to keep under control. There is a lot of knowledge in my head about which code is used where and which variables are shared between procedures while I am working on it. But all of this gets lost already after some weeks not looking at the code.

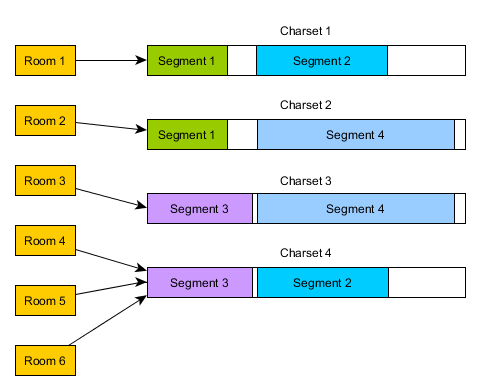
I am currently chasing a bug in my combat code and have the suspicion that it has to do with a temporary variable that is accidentally shared between the IRQ and the main loop. In order to help me finding that, I created a tool that will analyse my assembly source code and create a call graph. It is using GraphViz for this, a general purpose tool for drawing graphs. I first tried this on my complete code, but the resulting graph was utterly useless, because it was far too complex. But then I changed it to create graphs for each module (and treating calls to other modules as a single node), which made it actually useful! Here is a graph of a rather complex module, my main engine for the game.

Automatically generated call graph of charengine.asm

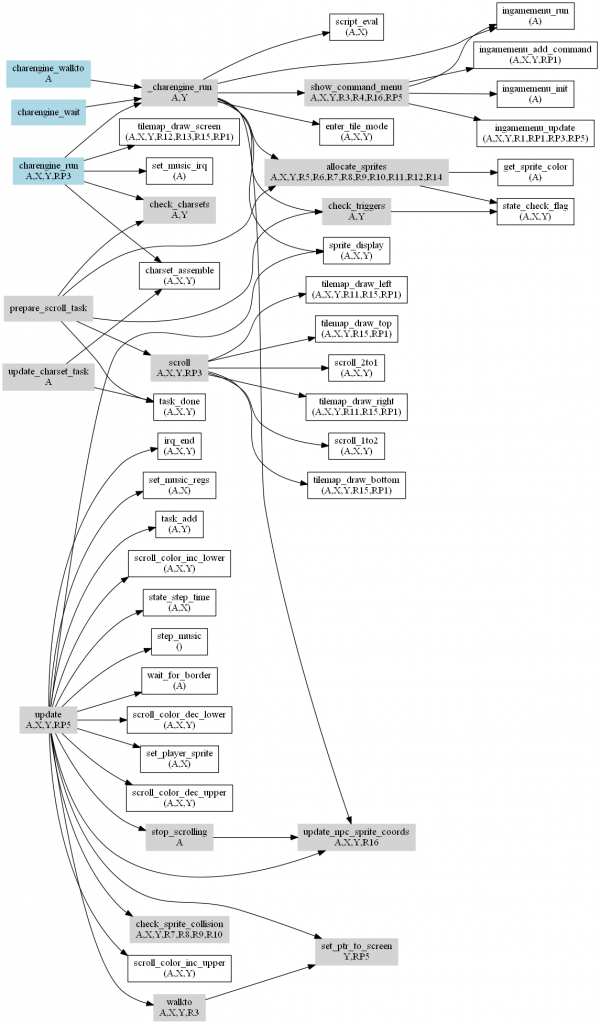
Yes, it looks complex, but with some understanding what the procedures actually do, it is really useful. Blue blocks are the interface of the module (the exported procedures that can be called from outside), grey blocks are internal procedures that are only called from inside of the module, and white blocks are procedures from other modules.

The tool will also identify all registers and global temporary variables that are used in a procedure, which are visible in the graph as A, X, Y and R1 – R14. These will also be patched into the procedure header in the source code accordingly. I was documenting this by hand in the past, but this is very error prone, as every time this changes in a procedure, the header of all calling procedures and the procedures calling those etc. need to be updated. It is also a lot of work and I frankly often did not care to do the manual update, so the headers were now either empty or wrong (which is even worse). Here is an example of procedure header:

;********************************************************************
; Purpose : Adds environment dependent commands to ingame menu
; Input   :
; Output  : A = selected menu entry
; Modifies: A,X,Y,R1,R3,R4,R16,RP1,RP3,RP5
;********************************************************************
.proc show_command_menu

    ; local variables
    commands_ptr    = R16
    num_commands    = R3
    command_counter = R4

    jsr ingamemenu_init ; add cancel menu entry
...

The actual analysis of the used registers and variables is rather primitive, but takes a couple of specialities of my source code into account. I sometimes define procedure specific names for the temporary variables, e.g. in the example above. I also make use of unconditional branches and of fall throughs at the end of procedures. All of this is considered during the analysis.

I am confident that this tool will help me finding bugs and ramping up after development pauses. Let’s see if it will be useful for the bug I am chasing! By the way, the tool is written in Java, which makes parsing text really easy. So it was implemented in a single day! Sometimes it is great to use modern languages after a while of assembly hacking.

More foreground/background fun

I was so fascinated by the cookie cutter technique, that I decided to take it a bit further and implement a complete dynamic foreground/background mechanic. The theory is not really complicated, but in this case the actual implementation was challenging. The only way to influence if a sprite is displayed before or behind another sprite on the C64 is to sort them accordingly. Sprite 0 is always displayed on top of all sprites, then comes sprite 1 and so on until sprite 7. So for every movement of the player, all sprites that need to be displayed are determined (remember that for the cookie cutter mechanism only the sprites that overlap with the player are required to be active) and then dependent of the position of the player they need to be sorted either before or after the player sprites (I am using 2 player sprites, one as black overlay over the other).  Sounds not too difficult, but I needed 3 attempts to get to an implementation that I found acceptable. The first was simply wrong, because I forgot that I must not change the order of sprites as they are listed in my room descriptions, or overlay sprites will suddenly disappear behind the sprites they are supposed to overlay. The second one was so twisted and unmaintainable, that my honor as a programmer was seriously impacted, so I had to do it a third time. The final implementation is still not super nice, I think the problem is simply that there are not enough registers on the C64 to do this really in a nice way. I split up the decision of the order of sprites and the actual handling of the related information (like screen positions, color, etc.) in two loops. This resulted probably in a bit slower code, but due to my task mechanism I described in an earlier post this is not an issue and can be done in the background during the rendering of 4 frames. Here is what you can do with the new code in another small video.

Yummy Sprite Pastries

I am currently making comparably good progress with the game engine and the editor. One notable thing that I added was the mechanism to allow fore- and background graphics. It is based on sprites and is making use of the “Cookie Cutter” effect: Sprites can have a lower priority than the normal graphic on the screen. At the same time, a sprite can have a higher priority than the player sprite. The player sprite again has a higher priority than the normal character graphic, as it is supposed to be displayed over the background graphics. This obviously creates a strange situation, where the player is configured to be displayed over the character graphic, the other sprite is displayed over the player sprite, and the character graphic is displayed over the other sprite. The video chip of the C64 solves this dilemma by displaying the character graphic over the player wherever the other sprite is non-transparent. A little bit like a cookie cutter will cut out parts of the dough. Sounds complicated? It is, but it can be used to create effects like the one below, where parts of the character graphic is displayed in the foreground, and other parts are in the background.  It needs some dynamic handling of the sprites, because the bridge in the video is clearly too wide to be covered by the available 6 sprites. So the sprites are only enabled when there is an overlap between them and the player. Apologies for the music, I always have some arbitrary SID blaring so that I can check if the available raster time is ok.

Slow, but Steady Progress

Phew, another 6 months went by. Is it possible that time is running so quickly? I spent time grinding through different tasks. I finished the automated map extraction that will magically extract all data that is required to control the background swapping of charsets that I described in the last post. The algorithm more or less starts with a map area that is about as big as one screen. It then increases the width and the height of the area until more than 256 characters are used. When that happens, it backs up a bit and starts a new area, until the complete map is covered. The screenshot below shows that the village level has 292 characters and is therefore split into 3 submaps.

I also added the handling of trigger areas (areas that will trigger a script when they are entered by the player) and command areas (areas that will add a command to the menu when it is opened while the player is inside) graphically in the editor, which makes creating them MUCH easier compared to the manual assembly source file hacking it was before.

A bit has happened on the graphic side, too. I created some more nature tiles to design a map in the woods. Designing trees is really difficult for me, but at least they look a bit better than the ones I had before. This is how it looks like:

Last but not least, I reworked the in-game menu and in particular the inventory handling. While the inventory was only informative until now, it is now fully functional and allows the equipment of items. I once again realize that I am no graphic wizard and it looks a bit pragmatic, but I still think it is an improvement to before and allows for much more complex quests. You might notice the attribute display in the right top of the screenshot below: yes, there will be more role playing elements coming.

 I guess the next big thing will be combat, and I am really excited to experiment with that. A convincing round based combat with a single player instead of a party is a challenging thing to do and I guess there will be a lot experimentation needed until it really works.

Automatic Charset Extraction

I mentioned in an earlier post already, that the ToS 2 game engine on the C64 is pretty flexible regarding the handling of character sets. The character mode on the C64, which is more or less required to create games with scrolling, makes use of one set of 256 characters at any given time. In ToS 1, every level consisted of two graphic sets, one for the outside world and one for all inside rooms. These two graphic sets had each a completely independent character set.

Now with the ToS 2 engine, I decided to allow to use a different graphics set for each room (with the outside world being a “room”, too). This allows for much more flexibility when designing rooms, e.g. rooms inside wooden huts, caves or palaces all in the same level. Obviously, defining the related character sets completely independently would need a huge amount of memory. Every full character set needs 2kb, so a dozen rooms would already use more than 20kb of charset data, which is by far too much. Therefore, the character sets are assembled from segments of characters, which can be combined in a mostly arbitrary manner. The picture below shows the principle.

Originally I thought that one could place these segments of characters at any location in the character sets, but using arbitrary positions for the segments creates a problem: The tiles used in the engine reference the characters in the charset by index. If the same segment appears at different places in different charsets, all the characters in the segment suddenly get different indices. So if a tile that uses a character from such a segment is used in different rooms, the index in the tile definition becomes ambigious. This would mean that the tile has to be defined several times, for each of the different character sets. As tile definitions are comparably expensive (16 bytes per tile), this did not seem a good thing to do. So all segments have a fixed position that is valid for all charsets in which they are used.

Managing the segments and character sets looks complicated, and it is. I did not want to spend time thinking about these things while creating levels, because that can really hamper creativity. So I decided to design an automatic mechanism in the editor, that would take care of deciding about which character to put into which segment, and how to combine the segments into character sets so that they fit for the rooms and need the smallest possible amount of memory at the same time. I did not find a suitable algorithm on the Internet, although it might well be that there are some. But I had a hard time coming up with suitable search terms, as the problem to solve is rather peculiar. In the end I came up with something myself after lots of head-scratching.

Unfortunately, a brute force approach that simply tries out all possible solutions and selects the best one does not work, because even for 256 characters the possible number of permutations is in the order of 10506. And that is only all possibilities for one single segment, the number gets far bigger when all potential combinations of segments are taken into account. Even for modern PCs this is far from doable in a reasonable amount of time. Instead, the algorithm that I came up with starts with a trivial solution: every single character is put in its own segment. After that, two segments are merged to a larger segment and it is verified, if the resulting segments can still be combined to character sets such that they cover every existing room, while still staying in the limit of 256 characters. The two segments that are chosen for merging are selected after evaluating, by how many rooms they both are needed. The two segments that are used together by the highest number of rooms are the best candidates. If merging them does not result in character sets that work for all rooms, the pair of segments with the next highest number of rooms that use both of them is tried. The merging is done again and again with the best candidates, until finally no further merge can take place because the resulting character sets get too large. The picture below shows the first three iterations in an example.Having this algorithm in the editor allows for a very memory efficient storage of flexible character sets, so that I can design the rooms in a level much more interesting. This solves one aspect of the handling of more than 256 characters. The other aspect is to identify areas on the map of a single room, for which the character sets can be adapted on the fly in the background while moving on the map in the game. Obviously, I also did not want to handle this manually, so I wrote another algorithm. But more on this in the next post…

Protovision, Cartridges and a Village!

So many things have happened since the last update! First of all, I am proud to be now a member of Protovision! This solved a couple of questions that were bugging me regarding the publishing of ToS2 on physical media: e.g. how to deal with the German FSK or or US MPAA or whatever legal age restrictions are relevant for computer games in all the countries around the world that ToS2 might be delivered to. Also, how to deal with payment and delivery for international customers etc. So I was pretty happy when Jakob from Protovision contacted me about joining them!

Now, the really cool thing is, that Protovision is ramping up on a new game cartridge developed with Individual Computers. The fantastic Sam’s Journey developed by Knights of Bytes will be released on this cartridge and I was able to get my hands on a test cartridge (unfortunately without a Sam’s Journey pre-release though). So I started integrating it into my development work flow and am happy to say, that I am really confident that there will be a cartridge version of ToS2! I would love to provide a disk version in addition, because I am a huge fan of good ol’ 5,25″ floppy disks, so potentially ToS2 will be released on both. Let’s see… In the course of working with the cartridge I also had the chance to chat quite a bit with Chester Kollschen from Knight of Bytes, which was a most interesting information exchange by itself!

This all means that I spent quite some time with the cartridge and with writing tools to make it work with the current development version of ToS2. Nevertheless I did some more work on the game itself. I am still in the process of finalizing the implementation of the new, highly memory efficient data structures for the game. But in order to learn efficient working with the editor I did a draft for a new level. Despite the general gloomy mood of the game, there will be a couple of light and friendly moments, too. One of them will take place in a scenic German village with pretty half timbered houses. I am currently really unhappy with the trees, so expect some changes there (and probably elsewhere, too). But without further ado, here comes a first screenshot of a ToS2 level!


Milestones and Kanban

In the last month I was able to finish version 1.0 of my game data editor “TOSEdit”. This is the first actually useful version, because it can create tiles, charsets and maps and export them in the same binary format as the wonderful CharPad. This will be the base for the further required features, that are needed to support the more special properties of the TOS2 C64 engine (like e.g. swapping parts of the charset on the fly). Interestingly, the implementation of the editing itself went pretty quickly (did I already mention that I love Java?). But what really needed time was a reasonable implementation of cut, copy and paste and of undo. I never implemented an undo mechanism before and it is actually quite a challenge. You need to do it completely for all actions that change the underlying data somehow, or it will fail miserably. Well, I was able to finish it and thought that this is worth a “release”. Where release in this context only means that I give it the satisfying version number 1.0 and write a blog post about it!

tosedit_1-0

I think working towards milestones and releases is so much more satisfying! When starting the work on the editor I decided to even go one step further and apply some agile methods to plan and track my progress. As I am the only person working on the project, Kanban seemed a reasonable method and what can I say: I love it! Kanban is a simple way to organize tasks (or rather “stories”, which are features that are needed, described from a stakeholder point of view). In my specific case there are 4 columns with such stories, a “Backlog” of things that I want to do at some time in the future, but did not think enough about that I could immediately start work on. After I spent enough thoughts about it, the story is moved to the “Selected for Development” column. When I actually start working on it, it gets moved to “In Progress” and when I finally finish it, it gets moved to “Done”. There is one specific rule that is typical in Kanban, which is that you limit the number of stories that can be in a certain column. In my case I decided to say that I never want more than 3 stories in progress. This helps to focus and get things done instead of being distracted too much.  I am using the wonderful Atlassian Jira (which is free for small projects and nicely combines agile methods with bug tracking) and below is a snapshot of my Kanban board, filtered for the TOSEdit 1.0 release. You can see that there is only one issue left (which is writing this blog entry), which I will move now to the “Done” column. Really satisfying!

kanban

The Editor

Wow, no posts for such a long time! Well, it is summer and I have to admit that I did a bit of a break from my PC while the weather was so nice. But did I take a break from the project? No! I spent a bit of time thinking about concepts, I fought a bit with infrastructure (and actually had to change the provider of my development VServer, well you get what you pay for), and I even spent some time with scissors, paper and glue and created some prototypes for a nice packaging. Googling the Internet for creating cardboard boxes is an, um, interesting experience. Apparently only kitsch fanatic house wifes seem to care for this normally. But who says I am normal :-)! The results of all this work are nothing exciting to show off, but were important to work on at some point (at least for me, as I am a bit fanatic about the overall experience of a product). On the code side I did lots of clean-up and integrated the task scheduler and the font swapping module I wrote about further down. I wrote many many unit tests, so I am of good hope that the game will be much less bug-ridden than the compo version.

What I did this weekend was maybe more exciting: I finally started work on the game editor. With all the new features of the game engine, standard tools are just not flexible enough to work with. So here comes a screen shot of the first editor version! A lot is still missing, but I feel I am on a good way:

tosedit It is really heavily inspired by the fantastic CharPad, I hope the creator does not see this as a plagiat, but rather a tribute to his great software! Especially the font swapping needs a lot of intelligence in the software.

Apologies once more for the delayed update! I expect them to happen more frequently now that the weather is getting more favorable for dwelling in my computer cave…

Tasks, schedules and priorities (2)

Apparently I was creating more questions than answering them in my last post. I will try to provide a bit more detail about the implementation of the task scheduler.

interrupt-3

The interrupt routine decides, if it wants to schedule a new task. If the new task has a higher priority than the one that is currently running, we want to switch to the new task. So what we need to make sure is, that when we return from the interrupt we do not return to the old task, but to the new one. In order to achieve this, we need to manipulate the stack accordingly, as the return address (and some more information) is stored there. Let’s look at what happens when an interrupt is triggered:

  1. the currently executed instruction is finished
  2. the current program counter is pushed onto the stack, high byte first
  3. the status register is pushed onto the stack
  4. the interrupt flag is set (because you usually would not want your interrupt routine to be interrupted itself)

All these steps are performed by the hardware itself. An interrupt service routine normally saves the registers in software in addition:

  1. A is pushed onto the stack
  2. X is pushed onto the stack
  3. Y is pushed onto the stack

How can we manipulate the stack now to return to a different task? We simply push respective data onto the stack!

    lda #>task
    pha          ; push >task
    lda #<task
    pha          ; push <task
    lda #0
    pha          ; push arbitrary states, IRQ flag must be clear
    pha          ; push arbitrary A
    pha          ; push arbitrary X
    pha          ; push arbitrary Y

When the end of the interrupt service routine is reached, it will restore Y, X and A and the final rti will pop the state register and jump to the new address we just pushed onto the stack! We do not have reasonable values for the registers (as the task was never executed before), so we simply chose 0. There is one caveat regarding the state register: we need to make sure that the interrupt flag is clear, or the interrupt will never be called again. It took me a while to realize this, as I was happily using php to push the current state register instead and as can be seen from step 4 above, that had the interrupt flag set.

Now let’s have a look at the task_done routine that is jumped to by a task when it is finished. In theory, all we need to do is to jump to the task with the next highest priority. Let’s for now assume, that the old task has the next highest priority. Things get slightly messy now: we still have the remains of the interrupt on the stack, but tasks are always executed in the main loop! So instead of jumping to the new task with jmp, we will misuse rti and simply do the same as we would do at the end of an interrupt routine:

    pla
    tay
    pla
    tax
    pla
    rti

Et voilá: we restore all registers and are back in the old task!

There is one additional thing that needs to be organized: when a task is added with a lower priority than the currently executed one, it needs to be stored for later. To do this, a list with upcoming tasks needs to be kept. Every time a task is done, the list needs to be searched for the next highest priority and the task needs to be pushed onto the stack as described above. But I am going to leave this little detail to be worked out by the reader (ha, I always wanted to say this cruel sentence at some point in my life)!

Tasks, schedules and priorities

Here we are with another rather technical update! Last time I was posting some information about how I want to get more diversity into the game graphics by switching parts of the character set on the fly while the player moves through the world. That actually raised an interesting new problem: how to handle tasks with different priorities!

Up to now there were only two possible priorities: tasks that need to be done during the currently displayed frame (like color RAM scrolling or inserting new characters at the border of the screen) and tasks that only need to be finished eventually during the next frames (like scrolling the currently invisible double buffer or checking for trigger areas for events). The character set swapping adds another priority: in theory it can take quite long and there is no need to have it finished in the next 2-3 frames, it is ok even if it takes e.g. 10 frames or so. Instead of patching this into the existing engine I decided to do it right from the start and be prepared for any upcoming additional tasks.  Which means: implement a task scheduler!

clocks-1098080_640

What does a task scheduler do? It makes sure, that most of the processor time is spent on the tasks with the highest priority. I simplified the concept a bit, so that higher priority tasks are always finished before lower priority tasks are continued. The implementation is actually simple, although there is some mean stack fiddling involved and it needed a bit of head scratching until I got it right. The interface of the scheduler module has only two routines: task_add, which adds a new task with a given priority and might switch to it immediately (if it is the highest priority), and task_done, which is called by a task when it is done and selects the next highest priority task to be executed.  All that is needed is to modify the stack such, that the RTI instruction at the end of the interrupt routine jumps to the right task. Apologies for the clumsy block diagram trying to depict this with an example. Did I mention that I am not a graphician?

In any case: implementation is done and unit tests are passing (yay!), so I am looking forward to put this new module into good use!